
Getting started with Raven Intelligence
Installing
Download the latest version (1.0.4) for your operating system (this requires admin privileges on your computer):
Part 1: Running a model
To run a model, simply select the model settings, choose your audio data and postprocessing steps, and click run. Part 1 of the documentation provides details on each of these steps.
Note: throughout this documentation we will refer to the Models folder. This folder is located under the user home directory, under “Raven Workbench/Raven Intelligence/Models”. For example, on a Windows machine it might be on the C drive at: C:\Users\yourusername\Raven Workbench\Raven Intelligence\Models
Model Settings
Select .ravenmodel file
- Purpose: Indicate which model you’d like to use by selecting its corresponding .ravenmodel configuration file. The dropdown also includes options to add an existing .ravenmodel file or create a new one. To create new .ravenmodel files, see Part 2: Configuring a new model.
- Allowed values: .ravenmodel files located in the Models folder (the dropdown will automatically show all .ravenmodel folders in the Models folder)
Threshold
- Purpose: Specify a score threshold for classification scores. Check the “skip thresholding” checkbox to bypass applying the threshold and show all scores.
- Allowed Values: Float (decimal) values greater than 0
Segment Duration
- Purpose: Specify the length of audio segments to feed into a model. Currently, segments do not span across files. If there is a partial segment at the end of the file and it’s at least half the segment duration, we pad with zeroes and include the segment. If it’s less than half the segment duration, we discard the partial segment.
- Allowed Values: Float (decimal) values greater than 0

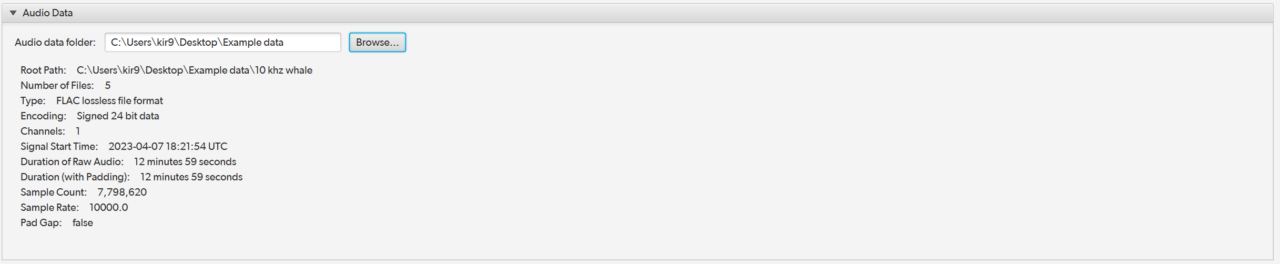
Audio Data
Choose the folder where your audio data are located. Information about the selected data is shown below for reference.
Postprocessing Steps
Choose what is done with the model outputs. Currently there are only three options – writing detections to a Raven Workbench table, CSV file, or the debug log. If you want to save the results of your run, you should include either CSV or table export, or both. You can select which steps are included by moving them from “available steps” into “included steps” and also reorder them by dragging.

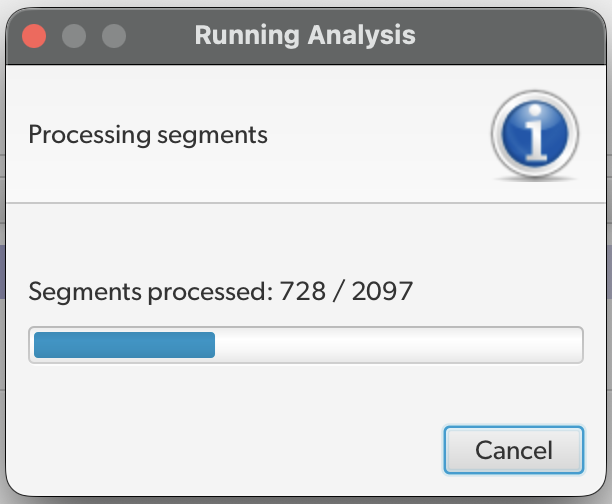
Run
Click Run to start running inference! You should see a progress bar showing how many audio segments are completed and are left

Part 2: Configuring a new Model
The Model Configuration Wizard is a guided interface designed to assist users in configuring Raven Intelligence to work with various detection models. This should only need to be done once for each new model. The output of the wizard is a .ravenmodel file containing the configuration information, which you can share with other users.

General Comments
Configuring a new model for Raven Intelligence requires having detailed information about the models’ format, inputs, and outputs. This information is generally found in model documentation.
.ravenmodel files can be shared between team members, so not everyone has to do the configuration procedure. The .ravenmodel for BirdNET 2.4 is already included with your install!
- The files for the model you wish to configure should be located in the Models folder. This directory is also where you should save the .ravenmodel files
- The only supported model types are: TensorFlow’s SavedModel format, Pytorch’s TorchScript format, or ONNX.
- If you have a model that doesn’t work with the existing configuration UI, please let us know! (k.reed@cornell.edu or Kate Reed on Slack!)
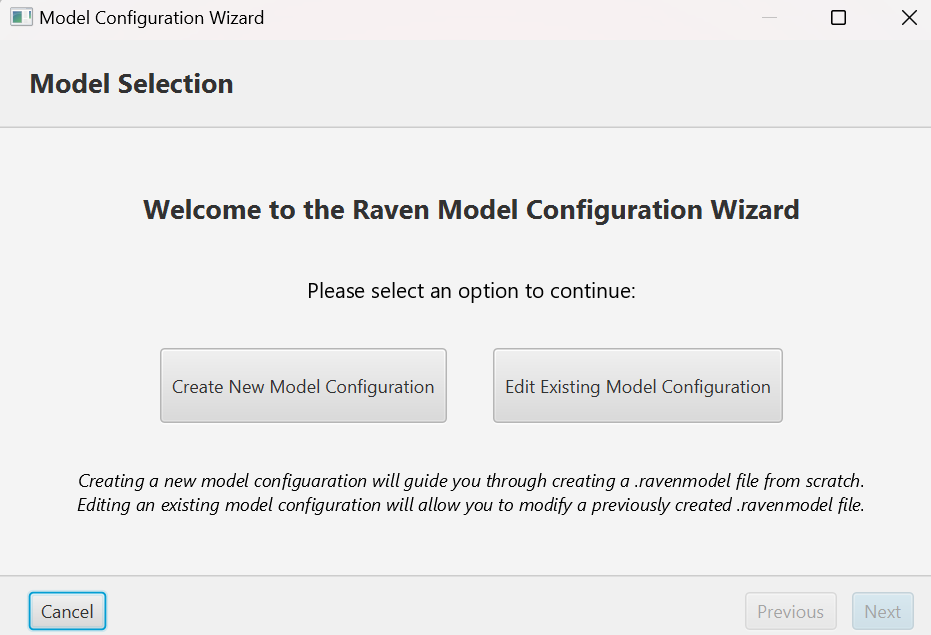
Screen 1: Create New or Edit
Start by choosing whether you want to create a new .ravenmodel file or edit an existing one.

Screen 2: General Configuration
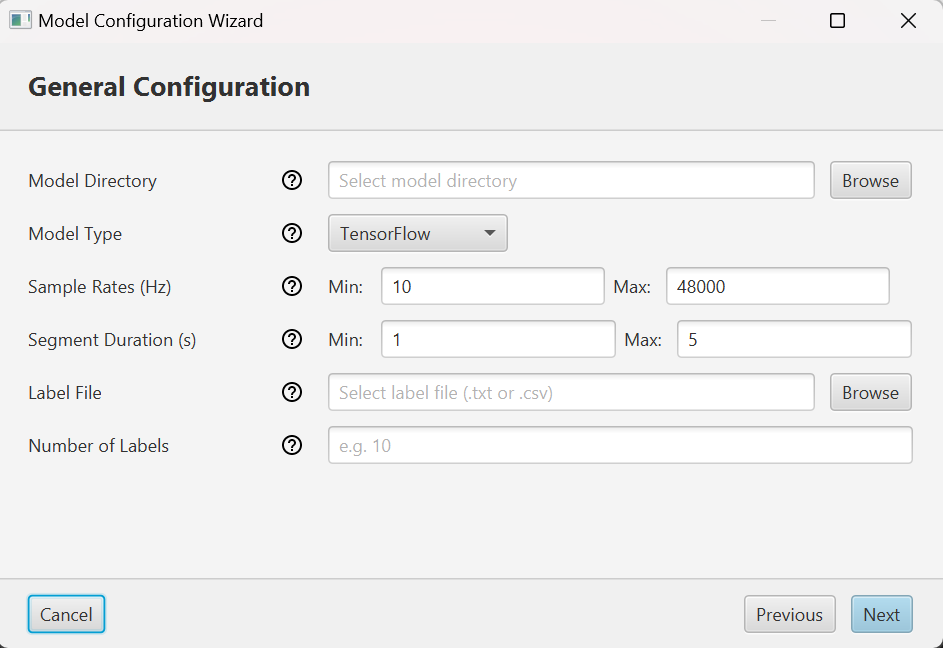
Model Directory
- Purpose: Specifies the directory that contains your model files.
- Allowed Values: This directory must be under the Models folder
- Autofill: None
Model Type
- Purpose: Indicates which ML framework your model uses.
- Allowed Values: TensorFlow, Pytorch, or ONNX (Note: we only support the SavedModel format for TensorFlow and the TorchScript format for Pytorch).
- Autofill: When you choose a model directory, autofills which framework you’re using based on the files in the directory.
Sample Rate
Min Rate:
- Purpose: Minimum sample rate for input signals (measured in Hz).
- Allowed Values: Integer greater than zero.
- Autofill: None
Max Rate:
- Purpose: Maximum allowable sample rate for input signals.
- Allowed Values: Integer greater than or equal to the minimum rate.
- Autofill: None
Segment Duration
Min Duration:
- Purpose: Specifies the minimum length (in seconds) of training samples.
- Allowed Values: Integer greater than zero.
- Autofill: None
Max Duration:
- Purpose: Specifies the maximum length (in seconds) of training samples.
- Allowed Values: Integer greater than or equal to the minimum duration.
- Autofill: None
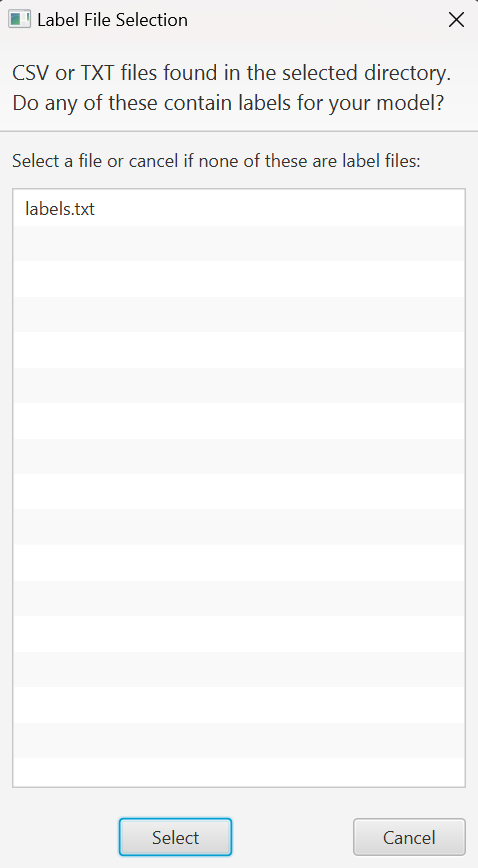
Labels File
- Purpose: Path to the file containing the labels for the file. There must be exactly one label per line with no additional header info or blank lines.
- Allowed Values: Path to a valid txt or csv.
- Autofill: When you choose a model directory, Intelligence will check for txt and csv files within the directory and ask if any of them is your labels file.
Number of Labels
- Purpose: Configures the number of unique labels/classes in the dataset.
- Allowed Values: Must match the number of lines in the labels file.
- Autofill: When a labels file is chosen, autofilled as the number of lines in that file.
Screens 3-5: TensorFlow-Specific Configuration
If you don’t have a TensorFlow model, the wizard will skip these screens and proceed to Screen 6.
Signature Selection
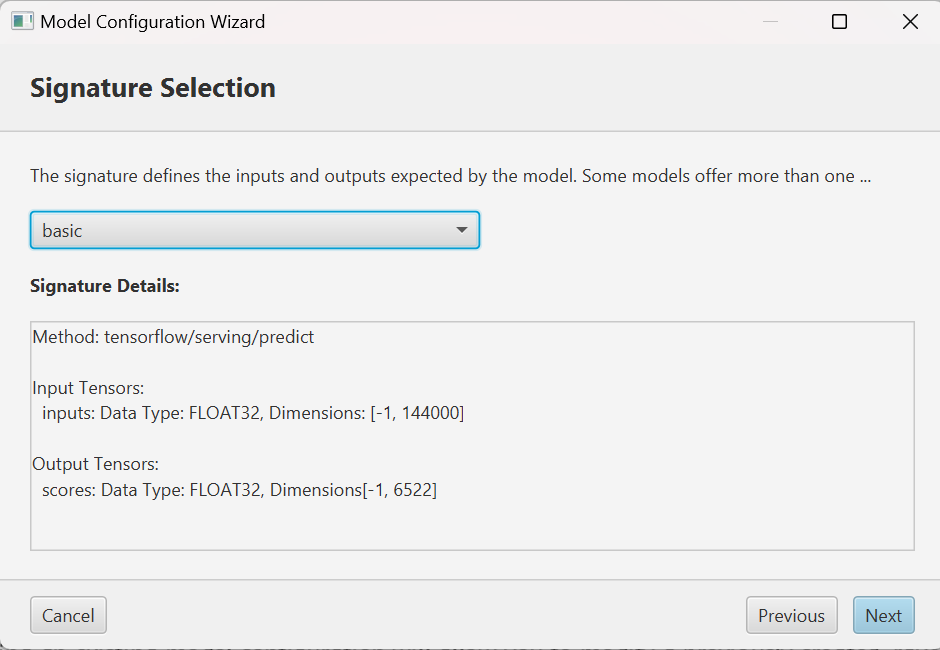
The model signature defines the data type and dimension of the input and output data of the model. Some models provide more than one signature. On this screen, use the dropdown to select the signature that contains classification scores. It may be called something like “basic”, “scores”, or “labels”. It should have at least one output tensor with a last dimension equal to the number of labels (e.g., 6522).
The text area below the dropdown provides some metadata information for each signature to help you choose.
Model Inputs
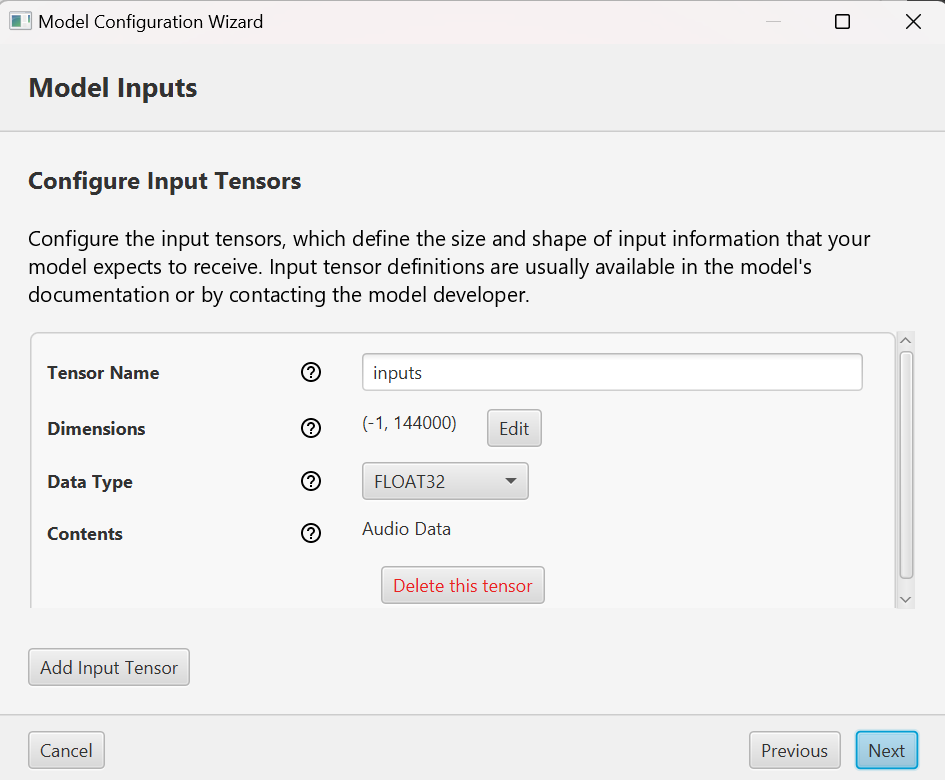
On this screen, check the configuration of the input tensors defined by the model signature. If your model only takes one tensor of audio data, all info on this screen should be automatically filled. Otherwise, you may need to manually input some values.
Note: The only input tensors we currently support are audio data or scalar values, which are sometimes included in signatures to provide additional parameters.
Tensor Name
- Purpose: Specifies the name identifier for the input tensor.
- Allowed Value: Must match the tensor name defined in the signature.
- Autofill: Pre-populated from the selected model signature. You should not change this unless it’s autofilled incorrectly.
Dimensions
- Purpose: Defines the shape and size of the input tensor.
- Allowed Values: Any number of dimensions from 0 to 5 (0 indicates a scalar). Can be edited with the “Edit” button.
- Autofill: Pre-populated from the selected model signature. You should not change this unless it’s autofilled incorrectly.
Data Type
- Purpose: Specifies the data type expected by the input tensor.
- Allowed Values: INT32, INT64, FLOAT32, FLOAT64, STRING.
- Autofill: Pre-populated from the selected model signature. You should not change this unless it’s autofilled incorrectly.
Contents
- Purpose: Indicates the contents of the tensor – audio data or a scalar – determined automatically from the dimensions (empty dimensions indicate a scalar, non-empty dimensions indicate audio).
- Allowed Values: Descriptive text (e.g., “Audio Data”) OR a text field to input the needed scalar value.
- Autofill: None
Model Outputs
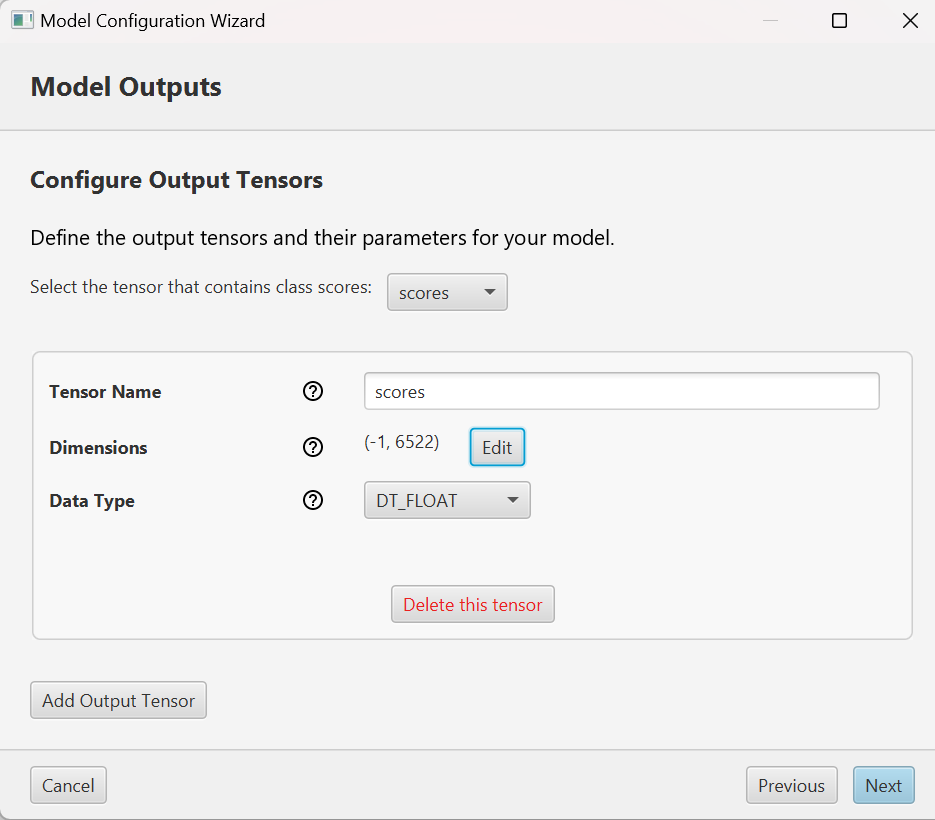
This screen is basically similar to the previous Model Inputs screen, with the addition of one dropdown at the top where you should select the tensor that contains the classification scores. It may be called something like “scores” or “classes” and should have a final dimension equal to the number of labels.
Screen 6: Save

Save your .ravenmodel file inside the Models directory, and you’re done!